skip to content
声控烤箱 | KazooTTT 博客

Notes(102) RSS feed
flow

61. ChainForge简单介绍

Updated:

ChainForge 简单介绍

Pasted image 20240417222811

官网:

ChainForge: A visual programming environment for prompt engineering

github 地址:

GitHub - ianarawjo/ChainForge: An open-source visual programming environment for battle-testing prompts to LLMs.

简介

Pasted image 20240417223400

使用场景

评估提示词

攻击性测试

评估模型

评估某项指标

实践

Pasted image 20240417231517

这两个例子单独拿出来讲

TODO

  1. 内部环境运行
  2. 内网环境 proxy [Add Custom Providers - ChainForge Documentation](https://chainforge.ai/docs/custom_providers/ 提供了自定义 llm

参考

使用案例:

X

自动化 Prompts

[2402.10949] The Unreasonable Effectiveness of Eccentric Automatic Prompts

相关的视频

LLM Prompt Injection Attacks & Testing Vulnerabilities With ChainForge - YouTube

使用 ChainForge 进行 LLM 提示注入攻击和漏洞测试

62. 沉浸式翻译自定义OPENAI接口油猴脚本报错

Updated:

沉浸式翻译自定义 OPENAI 接口油猴脚本报错

2024-05-21-14-49-20

我使用 oneapi 部署了我自己的服务,接入了 deepseek 作为翻译的模型。

但是在配置好之后开启翻译报错:

[!error] This domain is not a part of the @connect list

截图如下:

Pasted image 20240521143947 Pasted image 20240521144007

查询了一下:

@conncet 是油猴脚本一个 tag,作用是允许油猴脚本跨域请求对应的配置的域名

tampermonkey文档

所以油猴脚本报错的解决方法是:

  1. 手动地把对应的域名加上去 Pasted image 20240521143957
  2. 直接添加 // @connect *,这样后续也不会需要新增其他的配置了。
  3. 同理在油猴脚本的设置页面的用户域白名单新增对应的域名或者直接添加* Pasted image 20240521145459
  4. 最后一种简单直接的解决方法是直接使用浏览器插件,我个人的猜测是他们配置了 Match patterns 为<all_urls> Pasted image 20240521144021

63. 最近的感受-积重难返

Updated:

最近的感受 - 积重难返

23 年年末的时候内转到了做大模型应用的部分,起初是很兴奋和充满动力的。

因为可以一边学习一边做比较前沿的项目,还能白嫖各种大模型厂商的服务。不过这毕竟还是一份工作,公司不可能白养着人而不出成果,所以还是有上上线的压力的。我觉得到这里都是正常的。

但时间久了心里的不适感越来越明显。

首先是一直被诟病的基建,没有 CI/CD,发一次版自动 + 手动的流程结合起来要花上很久的时间,与此同时发布还需要等到 19 点,很多时候不得不为这个原因加班。并且外部服务到内网的代理十分不稳定,极大地降低了工作效率。

其次是心中对于项目的信心越来越不足。项目所使用的框架非常的笨重,不利于拓展,并且有比较严重的性能问题。并且我认为做 agent 最主要的目标是对于某一个领域的问题的结局能力的强弱。但是目前的产品给我的感觉是没有把注意力专注于能力本身,而是开始追求交互。

而且很奇怪的是这并不是一个 local-first 项目,后期是要接数据库的,结果想要我在我临时基于 indexedDB 写的历史记录的基础上更多的需求。

最开始搭后端框架的人的代码也是写的乱七八糟,restful 的出入参定义出现了很多字段不一致的情况,后来只能我自己手动去封装类。在我提出缺少状态码的疑问的时候,说根据 msg 的关键词来判断状态… 这也太硬编码了吧

最后就是对于未来的担忧了,最近约了几次面试,感觉外面确实好卷…但是我只有回家后才有时间学习,再这样下能力差距只会越拖越大。并且涨薪幅度很低,可以说是钱少事多的典范了。

64. 在前端使用abort取消请求

Updated:

在前端使用 abort 取消请求

举个例子,在写 llm 的 chat 的时候,经常会出现需要取消请求的场景。

如何在前端取消请求,涉及到一个接口:AbortController.AbortController() - Web API 接口参考 | MDN

在原生的 js 的写法,参考 mdn 的写法。

let controller
const url = "video.mp4"
const downloadBtn = document.querySelector(".download")
const abortBtn = document.querySelector(".abort")
downloadBtn.addEventListener("click", fetchVideo)
abortBtn.addEventListener("click", () => {
if (controller) {
controller.abort()
controller = null
console.log("Download aborted")
}
})
function fetchVideo() {
controller = new AbortController()
const signal = controller.signal
fetch(url, { signal })
.then((response) => {
console.log("Download complete", response)
})
.catch((err) => {
console.error(`Download error: ${err.message}`)
})
}

在 react 的写法

import React, { useState, useEffect } from "react"
const RequestComponent = () => {
const [responseData, setResponseData] = useState(null)
const [error, setError] = useState(null)
const [loading, setLoading] = useState(false)
const [controller, setController] = useState(null)
useEffect(() => {
// 组件被卸载的时候,取消请求
return () => {
if (controller) {
controller.abort()
}
}
}, [controller])
const fetchData = async () => {
setLoading(true)
setError(null)
const abortController = new AbortController()
setController(abortController)
try {
const response = await fetch("https://api.example.com/data", {
signal: abortController.signal,
})
if (!response.ok) {
throw new Error("Network response was not ok")
}
const data = await response.json()
setResponseData(data)
} catch (error) {
if (error.name === "AbortError") {
console.log("Request canceled by user")
} else {
setError(error)
}
} finally {
setLoading(false)
}
}
const cancelRequest = () => {
if (controller) {
controller.abort()
}
}
return (
<div>
<button onClick={fetchData} disabled={loading}>
{loading ? "Loading..." : "Fetch Data"}
</button>
<button onClick={cancelRequest} disabled={!loading}>
Cancel Request
</button>
{error && <div>Error: {error.message}</div>}
{responseData && <div>Data: {JSON.stringify(responseData)}</div>}
</div>
)
}
export default RequestComponent

在 solidjs 中的写法,可以参考 diu 老师的 GitHub - anse-app/chatgpt-demo: Minimal web UI for ChatGPT.

import { Index, Show, createEffect, createSignal, onCleanup, onMount } from 'solid-js'
import { useThrottleFn } from 'solidjs-use'
import { generateSignature } from '@/utils/auth'
import IconClear from './icons/Clear'
import MessageItem from './MessageItem'
import SystemRoleSettings from './SystemRoleSettings'
import ErrorMessageItem from './ErrorMessageItem'
import type { ChatMessage, ErrorMessage } from '@/types'
export default () => {
const [controller, setController] = createSignal<AbortController>(null)
const requestWithLatestMessage = async() => {
setLoading(true)
setCurrentAssistantMessage('')
setCurrentError(null)
const storagePassword = localStorage.getItem('pass')
try {
const controller = new AbortController()
setController(controller)
const requestMessageList = messageList().slice(-maxHistoryMessages)
if (currentSystemRoleSettings()) {
requestMessageList.unshift({
role: 'system',
content: currentSystemRoleSettings(),
})
}
const timestamp = Date.now()
const response = await fetch('/api/generate', {
method: 'POST',
body: JSON.stringify({
messages: requestMessageList,
time: timestamp,
pass: storagePassword,
sign: await generateSignature({
t: timestamp,
m: requestMessageList?.[requestMessageList.length - 1]?.content || '',
}),
temperature: temperature(),
}),
signal: controller.signal,
})
if (!response.ok) {
const error = await response.json()
console.error(error.error)
setCurrentError(error.error)
throw new Error('Request failed')
}
const data = response.body
if (!data)
throw new Error('No data')
const reader = data.getReader()
const decoder = new TextDecoder('utf-8')
let done = false
while (!done) {
const { value, done: readerDone } = await reader.read()
if (value) {
const char = decoder.decode(value)
if (char === '\n' && currentAssistantMessage().endsWith('\n'))
continue
if (char)
setCurrentAssistantMessage(currentAssistantMessage() + char)
isStick() && instantToBottom()
}
done = readerDone
}
} catch (e) {
console.error(e)
setLoading(false)
setController(null)
return
}
archiveCurrentMessage()
isStick() && instantToBottom()
}
const stopStreamFetch = () => {
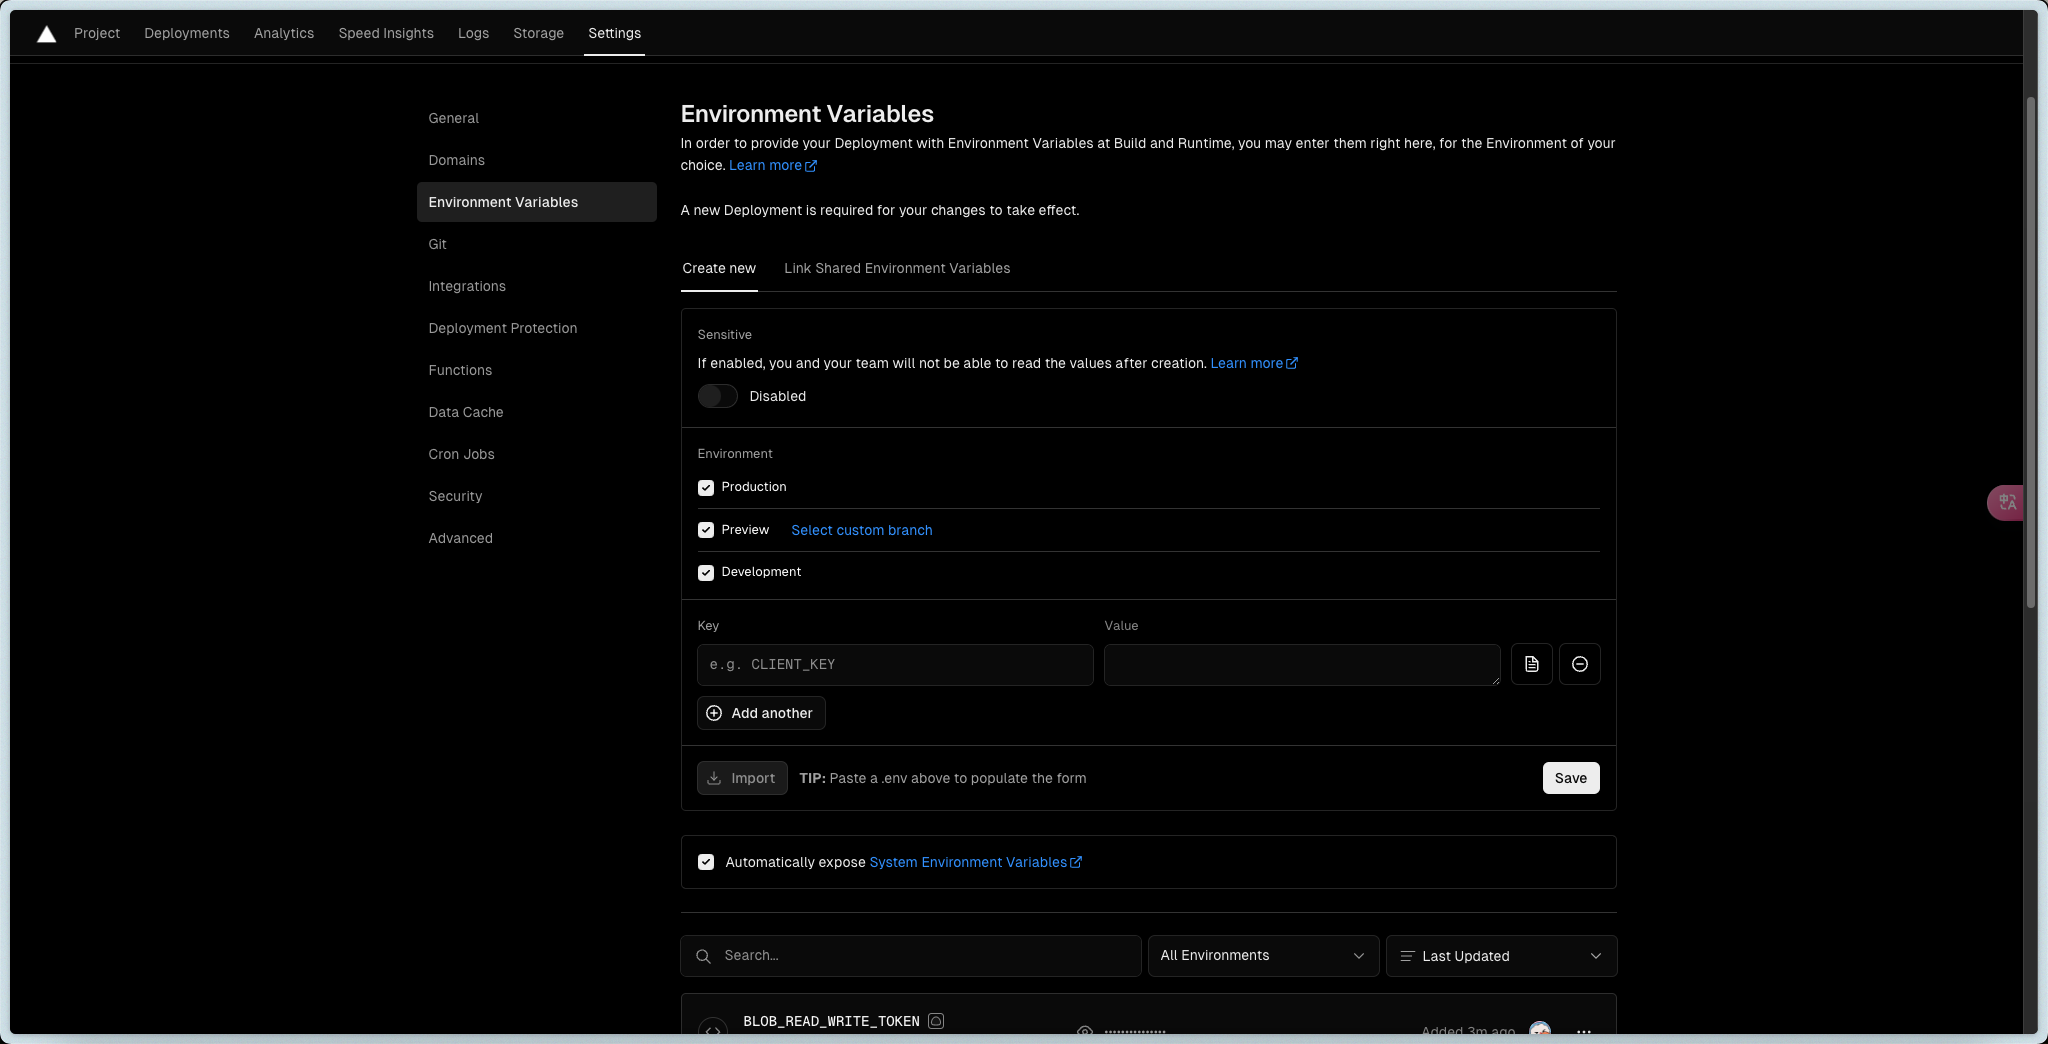
if (controller()) {
controller().abort()
...
}
}
return (
...
)
}

65. open graph 简述

Updated:

Open Graph 简述

场景

在我们使用 twitter 的时候,会发现有的链接会显示预览卡片,有的不会。

Pasted image 20240409203435 Pasted image 20240409204440

这是因为有的网站设置了 open graph,有的没有。

Pasted image 20240409103122

那么什么是 open graph?

open graph 是一个由 facebook 在 2010 年发布的协议,用于在社交网络上分享链接时,显示预览卡片。

Pasted image 20240409204654

我觉得无论是它的名称还是意图,都能看出 facebook 以及其他支持这种协议的社交平台的开放性, 特别是在某些平台会屏蔽外链或者限流带有外链的衬托下。

Pasted image 20240409205145

和 open graph 类似还有 twitter 自己的 card,如果 twitter card 和 open graph 同时存在的话,会先显示在 twitter card。如果 twitter card 没有定义,才会显示 open graph。

Pasted image 20240409213244 Pasted image 20240408163056

预览和检查工具

OpenGraph - Preview Social Media Share and Generate Metatags - OpenGraph

Pasted image 20240409201933

OpenGraph - Preview Images and Generate Open Graph Meta Tags

Pasted image 20240409195616 Pasted image 20240409131420

一些例子

Open Graph Examples

Pasted image 20240409131603

66. open-graph intro

Updated:

Open-graph Intro

open graph 简述

Scenario

When we use Twitter, we notice that some links display preview cards while others do not.

Pasted image 20240409203435 Pasted image 20240409204440

This is because some websites have set up Open Graph, while others have not.

Pasted image 20240409103122

What is Open Graph?

Open Graph is a protocol introduced by Facebook in 2010, used for displaying preview cards when sharing links on social networks.

Pasted image 20240409204654

From its name and purpose, it’s evident that Open Graph signifies the openness of Facebook and other platforms supporting this protocol, especially amidst certain platforms that block external links or throttle those containing external links.

Pasted image 20240409205145

Similar to Open Graph, Twitter has its own card system. If both Twitter Card and Open Graph coexist, Twitter Card takes precedence. Only if Twitter Card is not defined, Open Graph is displayed.

Pasted image 20240409213244 Pasted image 20240408163056

Preview and Inspection Tools

OpenGraph - Preview Social Media Share and Generate Metatags - OpenGraph

Pasted image 20240409201933

OpenGraph - Preview Images and Generate Open Graph Meta Tags

Pasted image 20240409195616 Pasted image 20240409131420

Some Examples

Open Graph Examples

Pasted image 20240409131603

67. 与其倒腾,不如静下心来

Updated:

与其倒腾,不如静下心来

我这个人一直都有一个不好的习惯,就是对于任何事物都是浅尝辄止,技艺不精。

如果说是无关紧要爱好,其实这没什么,但是关乎到职业发展的技能也是如此。

就拿博客来举例,我总是想要倒腾博客,从各种框架,各种主题之间不断的切换,做了很多重复性的工作。虽然乐在其中,但是仔细想想并没有什么实际的用途。

所以我想控制一下自己的手,目前将自己的记录和发布模式固定一下。具体的规划如下:

  1. 首先,使用 obsidian 和 flomo 作为本地的编辑器。obsidian 用于记录笔记和比较正式的可能需要发布的内容。而 flomo 则是一些碎片化的内容,可能是个人的碎碎念,也可能是一些小脑洞。
  2. 然后,obsidian 的内容与 Welcome to Quartz 4 绑定,如果有更新则会自动地部署上去,这里自动更新的内容都是一些很随意的笔记的内容。
  3. 再然后就是上传到 notion 了,这里的内容还是比较水。
  4. 最后是比较正式的内容,会通过 obsidian 的插件上传到掘金、xlog、微信公众号。

也就是说内容的质量由低到高的排序是:

本地 obsdian > quartz > notion > 掘金、xlog、微信公众号。

我认为记录的初心是为了自己,然后再是分享。因此质量低一点只是给自己看没有关系,后面有比较好的内容再放到更公开的平台分享,是比较合适的方式。

而不是每次更新内容就想着要传播,这是不对的。

68. 2024-03-06

Updated:

今天要做的事情

打卡

工作上排了一天的错,本来要做的工作也没有做。

给 autogen 和 notionnext 提了 pr,autogen 的已经被合并了,这是第二次被 autogen 合并,

🙏非常感谢。

然后开通了 notion ai,发现它支持 google pay,这点对我来说挺友好的。开通的原因是想用它的自动生成 tags 和 summary 的功能。搭配 notionnext,比较方便。然后迁移了一部分本地的内容到博客上去。

买的时尚小垃圾到了,挺喜欢的。

IMG-20241021113029511 IMG-20241021113029604 IMG-20241021113029671

今天的不足之处是没有学习也没有刷题。

昨天太累了,今天早睡吧。晚安。

今天记录的内容

table file.path
from ""
where dateformat(file.ctime, "yyyy-MM-dd") = "2024-03-06"

明天要做的事情

Inbox

69. 2024-03-05

Updated:

今天要做的事情

打卡

主要在看 Python,另外刷了两道算法题。

帮之前部门的人面试了一个前端。​​​

今天记录的内容

table file.path
from ""
where dateformat(file.ctime, "yyyy-MM-dd") = "2024-03-05"

明天要做的事情

Inbox